Contents
Updated on: 6th November, 2018
Voluum now offers 25% discount until 31st of December 2018.

✅ Intro
Properly understanding tracking in affiliate marketing can be a tough problem if you’re just starting out and are about to launch your first campaign.
There are too many small things that need to be done before everything works as a well-oiled machine.
Don’t worry, though.
After reading this guide, you will be able to set up everything by yourself and enjoy all the great features that trackers offer.
✅ What is tracking?
When I heard about tracking for the first time (back in 2012), my mind was totally blown.
I was browsing through some affiliate forums similar to STM forum and some guy posted a screenshot of his earnings.
He was able to track his profits, costs, and conversions in real-time.
I remember that there were also many other reports and analytics that could show more information about his campaigns.
What?
The only “tracker” or “analytics” tool I had seen until this time was Google Analytics, and I thought that was the king of all “tracking”.
So you can see it was a totally new concept to me at that time, and it also may be to you if you are just switching to paid traffic affiliate marketing (I was doing SEO before).
Anyhow… let’s get back to the main question: What is tracking?
Tracking is the process of monitoring everything that goes on with your campaign, and the software that we use to do so are called trackers.
The tracking process usually works like this:
- You buy traffic from a traffic source
- You send it to your tracker
- The tracker sends your visitors to your landing page or offer
All of the magic happens in Step 2.
The tracker notes all of the information that your traffic source is sending to it. That information varies from source to source and also from your setup, but it could be something like this:
- the source of traffic (i.e. placement or zone)
- the category of that source (i.e. Entertainment, Education, Business)
- the banner that was clicked
- the cost of the click
It also saves all visitors’ information, like:
- country, region, or city
- device and device type
- mobile brand and model
- operating system and its version
- browser and its version
- IP address
- ISP, connection type, and mobile carrier
- referrer
- language
- etc.
Suddenly, from that 1 visit that hit your tracker, you extracted all of this useful information.
You will also know which landing page they landed on if they clicked through and, most importantly, whether they converted or not.
Besides that, you can work some magic on your own.
You can set up your own rules and decide how you want your traffic to flow.
Example: Imagine you launched a campaign in Malaysia. In Malaysia, there are at least 3 languages spoken: English, Malay, and Chinese, among others.
So what you can do is create 3 landing pages for each of these languages and set your tracker to send visitors to the appropriate landing page based on their browser settings (Voluum detects this automatically for you).
Other important metrics that trackers will show you include:
- visits
- clicks
- profits
- costs
- conversions
- landing page CTRs
- conversion rates
- ROI
- EPC
- and many others
Now you should have a better understanding of what a tracker is and why it is so important to performance affiliate marketers.
Without using proper tracking software, you don’t really know what’s going on with your campaigns — you are just throwing shit against the wall to see if it sticks.
Next: There are 2 big groups that differentiate trackers: self-hosted and cloud-hosted. Let’s talk a bit about that.
✅ Self-hosted vs cloud-hosted trackers
Before you choose your tracker, you have to decide between self-hosted or cloud-hosted trackers.
Self-hosted tracker
As its name suggests, self-hosted trackers are hosted on your own servers.
That means you will have to purchase your own VPS or Dedicated Server.
That is an additional cost on top of the cost of the tracker.
You also need to have a good understanding of server administration or hire a professional to do it for you.
These are things you need to consider when you choose the self-hosted tracker route:
- hosting and its maintenance and costs
- maintaining the tracker (installing updates)
- monitoring servers (so you can control your traffic if your server fails)
Cloud-hosted tracker
Cloud-hosted trackers, on the other hand, are hosted in the cloud.
That means that you don’t need additional hosting for your tracker (but you will still need hosting for your landing pages).
The technical aspect of the tracker is taken care of for you.
All you have to do is log in to your tracker interface and do your work.
I personally prefer cloud-based trackers or at least trackers that offer managed service, as I don’t like to deal with the technical side of them (even though I’m good with servers).
I couldn’t sleep well with the idea that I’m sending hundreds of thousands of visits to my tracker and it could fail overnight.
Imagine the sudden loss it could create in just a few minutes.
So having a good tracker with top-notch tech behind it is a must.
Next: Let’s cover the most popular trackers that are available on the market nowadays: Voluum, Thrive, FunnelFlux, and AdsBridge.
✅ Trackers on the market: Voluum, Binom, Thrive, FunnelFlux, and AdsBridge
It’s 2017 and there’s no better time for tracker shopping than now.
Just a few years ago when I started, there were only a few trackers with very limited functionalities and they were all self-hosted.
Then Voluum arrived, and the tracker market boomed!
Modern tracker software competitors entered the scene and totally destroyed the old players that were around for years.
I should note that I’m personally using Voluum (I’m very happy with it) and I don’t have experience with the other trackers on the list.
However, I want to keep this guide as honest as possible, so I’m including them in here as well.
✅ Voluum
Voluum has been recently rebranded and they updated their logo (2018)
Voluum’s old logo
Voluum is a cloud-hosted tracker, and it’s the one that totally changed the game.
After it came onto the market, I never heard anyone talking about CPVLab or Prosper202 anymore, which were the top trackers before (I used CPVLab).
They have probably the best infrastructure in the whole tracking industry. Everything is in the cloud, across continents, which means the fastest redirects you can have.
Fast redirects are very important, especially if you are going to run worldwide traffic on mobile.
Faster redirects = less click loss
Voluum has “infinite scalability”, which basically means that they can handle all of your traffic without worrying about server downtimes.
Setup (as you will see below) is very easy, and they have a modern UI that’s pleasant to look at (which is also an important factor, as you will spend hours on your tracker).
Reports are in real-time and you can do amazing things there.
Your can view your campaign from almost “any angle” you wish, and if it’s still not enough, you can do multiple-level drill downs.
On top of that, they have mobile apps for both iOS and Android so that you can monitor your campaigns “in the terrain.”
I especially love the widgets that I can place on my screen in the Android version of the app.
Voluum also has an API, so you can build your extensions or tools on top of it.
Voluum Pricing
Starts at $299/month for the lowest package, which includes 2,000,000 events (visits+clicks+conversions). Voluum doesn’t have free trial at the moment.
Voluum Free Trial
Many people asks if Voluum does have a free trial as most of the other trackers do have it.
When Voluum started out in 2013 they used to be totally free, then they introduced paid packages and still had a free package with 100 000 free events.
Unfortunately these days (September 2018) they do not have a free trial or any other free package option.
✅ Binom
![]()
Binom is a self-hosted tracker and is recently getting lot of traction.
It got all the features that Voluum has + many more such as smart rotations, custom columns, e-commerce features, event system, tracking exit points, smart meta refresh and so on.
I recently wrote an in-depth review of Binom and you should really take a look at it, even if you think that self-hosted tracker is not something you are into.
Binom Pricing
Binom costs $99/month (or $69 with a yearly plan) and for additional licenses they charge $49/month. Everything is unlimited and you can have as much events, domains and users as you want.
Binom Free Trial
Binom offers a 31-days free trial. You can also get a free month + 40% discount if you use coupon ERIK40 when you sign up with Binom.
✅ Thrive (now called ThriveTracker)
![]()
If I remember right, Thrive was introduced to the market shortly after Voluum, becoming its main rival.
What I like about Thrive is that they offer both self-hosted and cloud-hosted options.
One interesting feature they have is the ability to track your conversions without extra redirects.
It’s done with a special LP pixel that you have to include in your landing page source code.
The benefit of this feature should be clear: less click loss.
They also offer many batch actions (which Voluum doesn’t include), so you can edit multiple offers or landing pages simultaneously or add 100 landing pages through CSV import.
Thrive Pricing
Starts at $99/month for self-hosted service and $299/month for managed cloud-hosted service.
For the self-hosted service, there is also an additional cloaker / bot filter add-on for $59/month and a multi-user access add-on for $79/month, which totals to $237/month.
Learn more about Thrive Tracker here.
Thrive Free Trial
ThriveTracker currently offers 14-days of free trial.
✅ FunnelFlux
![]()
FunnelFlux or, as it calls itself, “The Visual Tracker”, is taking a different, yet very original, visual approach.
It’s a self-hosted tracker and its main and best feature is the possibility to create visual funnels.
You build your funnels visually using a visual editor. There is also no need to place any other scripts on your page, and you can build any funnel you can think of.
FunnelFlux can also show you the lifetime value of your leads, has a powerful statistics engine, and tracks 60+ key performance indicators automatically.
FunnelFlux Pricing
Starts at $99/month, but keep in mind that you will also need additional hosting, as FunnelFlux is a self-hosted tracker. The recommended server setup for 200,000-1 million visitors per day is a Vultr server with 8 to 16 CPUs and a minimum of 16GB memory, which falls between $160 and $320/month for server costs.
Learn more about FunnelFlux here.
FunnelFlux Free Trial
FunnelFlux tracker offers a “TestDrive”, which is technically a free trial, it is very limited though as it lasts only 3 days.
✅ AdsBridge
![]()
AdsBridge is the new kid on the block.
It’s a cloud-hosted tracker, and a couple of their extra features compared to the other trackers I’ve mentioned is a landing page builder and hosting.
What that means is that you can create or design and host your landing page on AdsBridge servers.
Another feature that got my attention is SMS & Email Alerts that can really come in handy in many cases, and I wish Voluum had it too.
AdsBridge Pricing
Starts from $0/month for a 14-day trial followed by a $75/month package with 1000 000 visits/month.
Learn more about AdsBridge here or read a in depth AdsBridge review from my friend Servando.
AdsBridge Free Trial
AdsBridge offers a 14-days of free trial. It’s basically a hard limited package with 50 000 free events.
This was a short intro to other trackers, but as I said earlier, this tutorial is about using and setting up campaigns in Voluum, which is the tracker that I have the most experience with.
So let’s start!
✅ Switching to Voluum?
If you’re already using another tracker and thinking about switching to Voluum, here is a simple method on how to do it without major pain:
Keep your old campaigns in your old tracker and start your new ones in Voluum.
Easy, right?
Create Your Voluum Account
If you don’t have your own Voluum account yet, you can create it from here.
Once you have your account set up, log in and proceed to the next step:
How to Set Up a Custom Domain in Voluum
One thing that I recommend everyone do before they launch their campaigns is to set up a custom domain.
Voluum by default gives you a free domain of their own, but that might already be banned by traffic sources or flagged by Google or antivirus companies.
Register a domain name
![]()
First, you need to register a domain name.
I recommend doing it through NameCheap, as they give you FREE WHOIS Privacy Protection for the 1st year, and they also often have promotions like domains for 80 cents a pop.
To point your new domain to Voluum, you have to set your DNS records.
In Voluum, navigate to Settings -> Domains.
Copy your Voluum domain (there are currently 3 choices — you can copy any of those).
Next, at NameCheap, find your domain and go into its management. Then click on the “Advanced DNS” tab and:
- add a new CNAME record.
- set host to something like “track” (so if you have domain campaigns.com it becomes track.campaigns.com)
- set value to your Voluum domain value that you copied before (ie. qwerty.voluumtrk2.com)
- you can leave TTL at its default value
Save all changes and wait for your new DNS settings to propagate.
I like to monitor it live using a free tool called WhatsMyDns.net; it’s a free global DNS propagation checker.
To check for your changes above, type in your domain (i.e. track.campaigns.com), select CNAME from the select option, and hit search.
The next step is to add this domain to Voluum, so go back to Settings -> Domains and:
- add your own custom domain
- make sure you click “Set as main domain”
- you can also monitor if the DNS is set correctly using the “Verify DNS settings” button
How to Use Tokens and Types of Tokens
Before we talk about adding things to Voluum (by things, I mean landing pages, offers, and so on), let’s talk a bit about tokens.
What is a token?
A token is nothing more than a variable that can hold many different kinds of information, and it can be prepopulated in 2 ways:
- by a traffic source
- by your tracker
Traffic Source Tracking Tokens
Almost all traffic sources these days support tracking tokens. Tracking tokens are dynamic variables that can be assigned to the query string in your URL to send more information back to your tracker.
If you are running mobile pop traffic, the most common token you will have in every source is your placement ID (also called the site ID, zone ID, or simply placement).
Example: Let’s say you are setting up a campaign on PopAds. They’ve got a token for placement called WEBSITEID, so if you set your campaign URL as http://track.campaigns.com/tracking-link?websiteid=#websiteid (#websiteid is the token), it will become http://track.campaigns.com/tracking-link?websiteid=12345.
Tracker URL Tokens
Another type of token is a URL token, provided by your tracker.
That’s another great reason to have a tracker. As I mentioned before, trackers can detect many useful things about your visitors, such as their country or city where they are located.
You can use this information to your advantage and, thanks to URL tokens, you can send and display them on your landing page.
Example: You enter your landing page into your tracker as: http://mylandingpage.com/?brand=#brand&city=#city. Voluum will translate it to: http://mylandingpage.com/?brand=Apple&city=Sydney. Then you just add a simple script on your landing page to display your visitors’ mobile phone brand and the city where they are located. This gives you unlimited possibilities on how to craft the copy for your landing pages!
I hope tokens now make at least a bit more sense to you.
You will use tokens a lot during your affiliate career.
Postbacks and Postback URL
When it comes to tracking conversions, there is the important concept of postbacks that you need to understand.
Postbacks are server-to-server (S2S) calls that enable your affiliate network to notify your tracker that a conversion happened.
Every time a visitor goes through your tracking link, Voluum generates a unique click ID that is then sent to your affiliate network.
If the visitor converts, your affiliate network sends the conversion back by calling your postback url and attaching your unique click ID to it.
Your tracker then thanks to click ID knows to which campaign to assign your conversion.
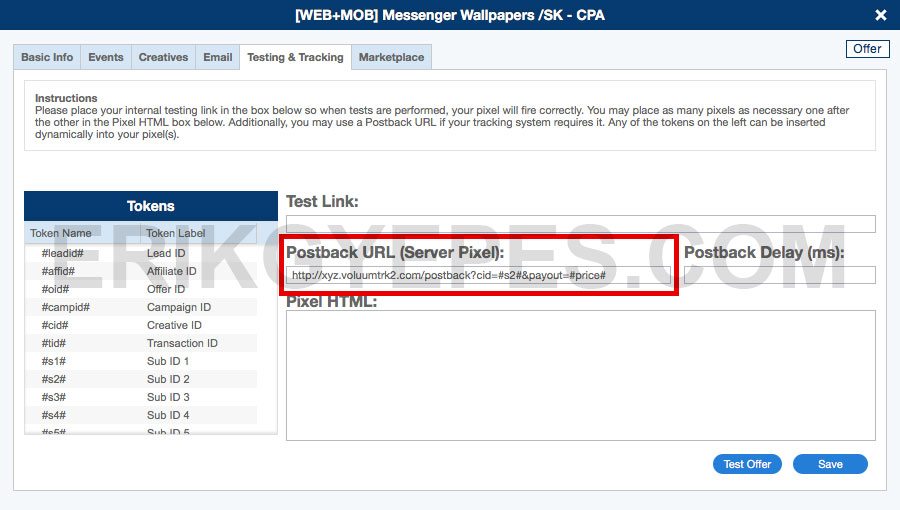
You can find your postback URL in Voluum by navigating to Settings -> Setup, under “Postback URL”.
Example: http://xyz.voluumtrk2.com/postback?cid=REPLACE&payout=OPTIONAL&txid=OPTIONAL
The most important part of it is cid and payout.
You will have to replace their variables inside your affiliate network system.
Here is how you do it for the Cake system (it’s the one that networks like ClickDealer or Gotzha use):
Here is how you do it for the HasOffers system (used by network like AppFlood):

This is maybe the most technical and confusing part of all tracking, but also the most magical one. Thanks to tracking conversions, you will later be able to optimize your campaigns and make more profits!
How to add affiliate networks
One of the first things you are going to add to your tracker is an affiliate network.
The guys at Voluum did a great job of prepopulating it with “trusted affiliate networks”.
Here is how you add a new Affiliate Network in Voluum:
- Navigate to your Affiliate Networks tab.
- Click on the “New affiliate network” button.
- Choose one of the predefined networks or add your own by entering the affiliate network’s name.
- Click “Save”.
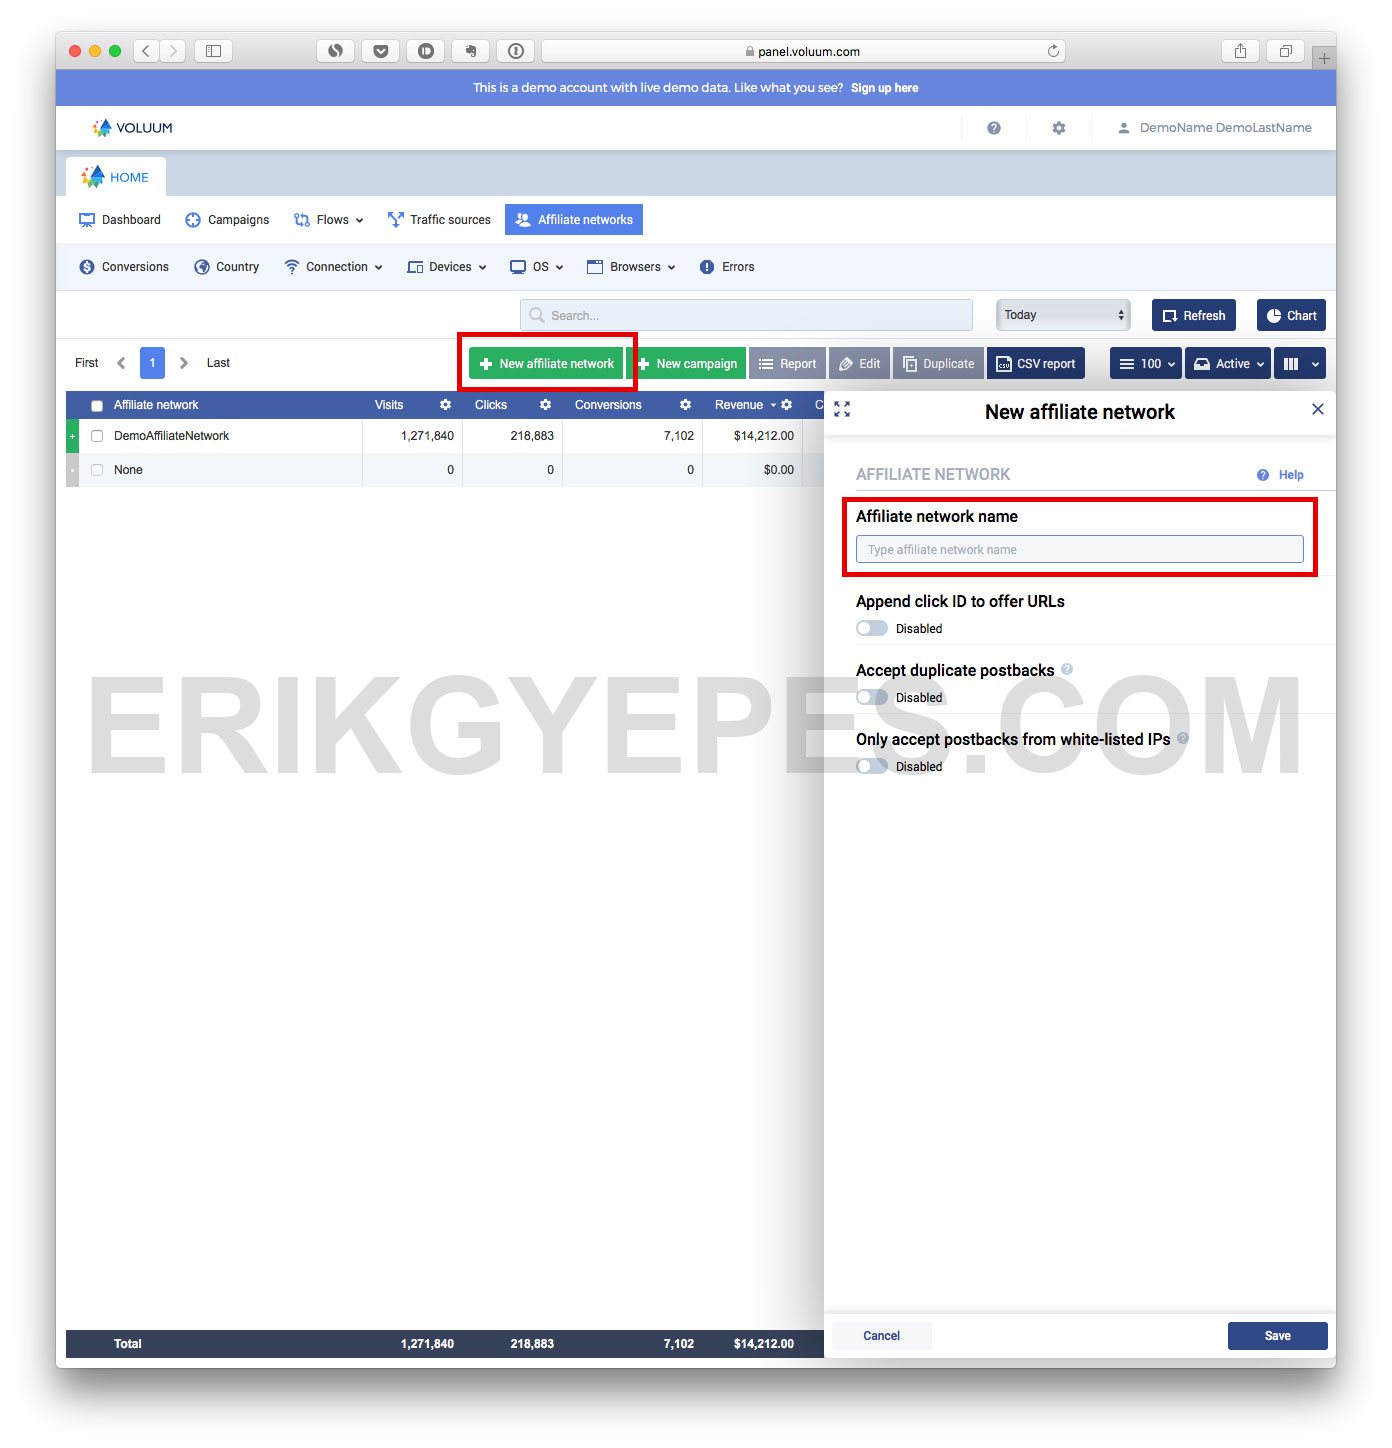
That’s it, you just added your very first affiliate network into a tracker!
How to add traffic sources
Once you’ve added an affiliate network, you need a traffic source.
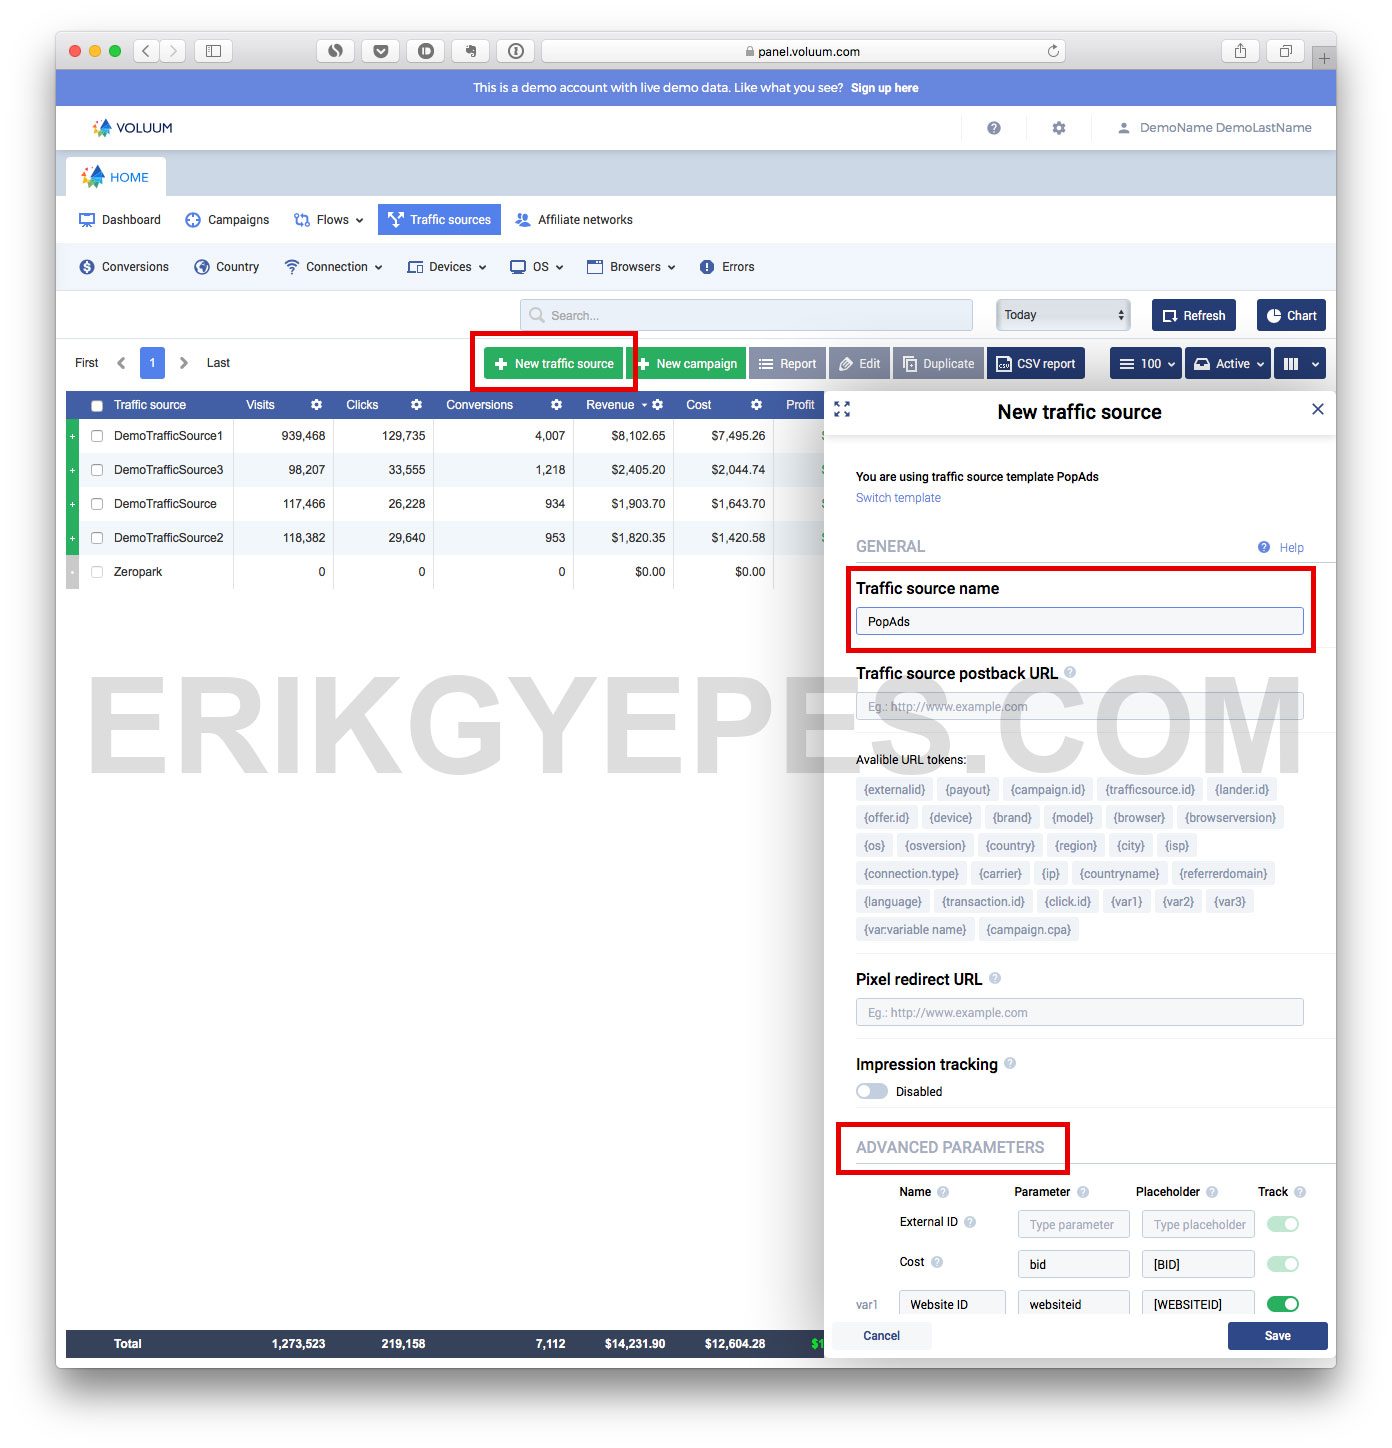
Here is how you add a new traffic source in Voluum:
- Navigate to the Traffic sources tab.
- Click on the “New traffic source” button.
- Choose from a predefined one or add your own by entering the traffic source’s name.
- You can ignore the Postback URL (this is for sending your conversions back to the traffic source) and other checkboxes below for now.
- Click on “Advanced”. This is where you enter your tokens, and it’s probably a bit confusing if you’re just starting out. That’s why I wrote about tokens initially, so you could understand them better at this point. (See my screenshot and tip below for this step.)
- Click “Save”.
Now about Step 5, entering traffic source tokens: As each traffic source has different tokens, this section will be different every time. The easiest way is to use the predefined traffic sources. If the traffic source is not on the list, I recommend using trackingtokens.com.
How to add offers
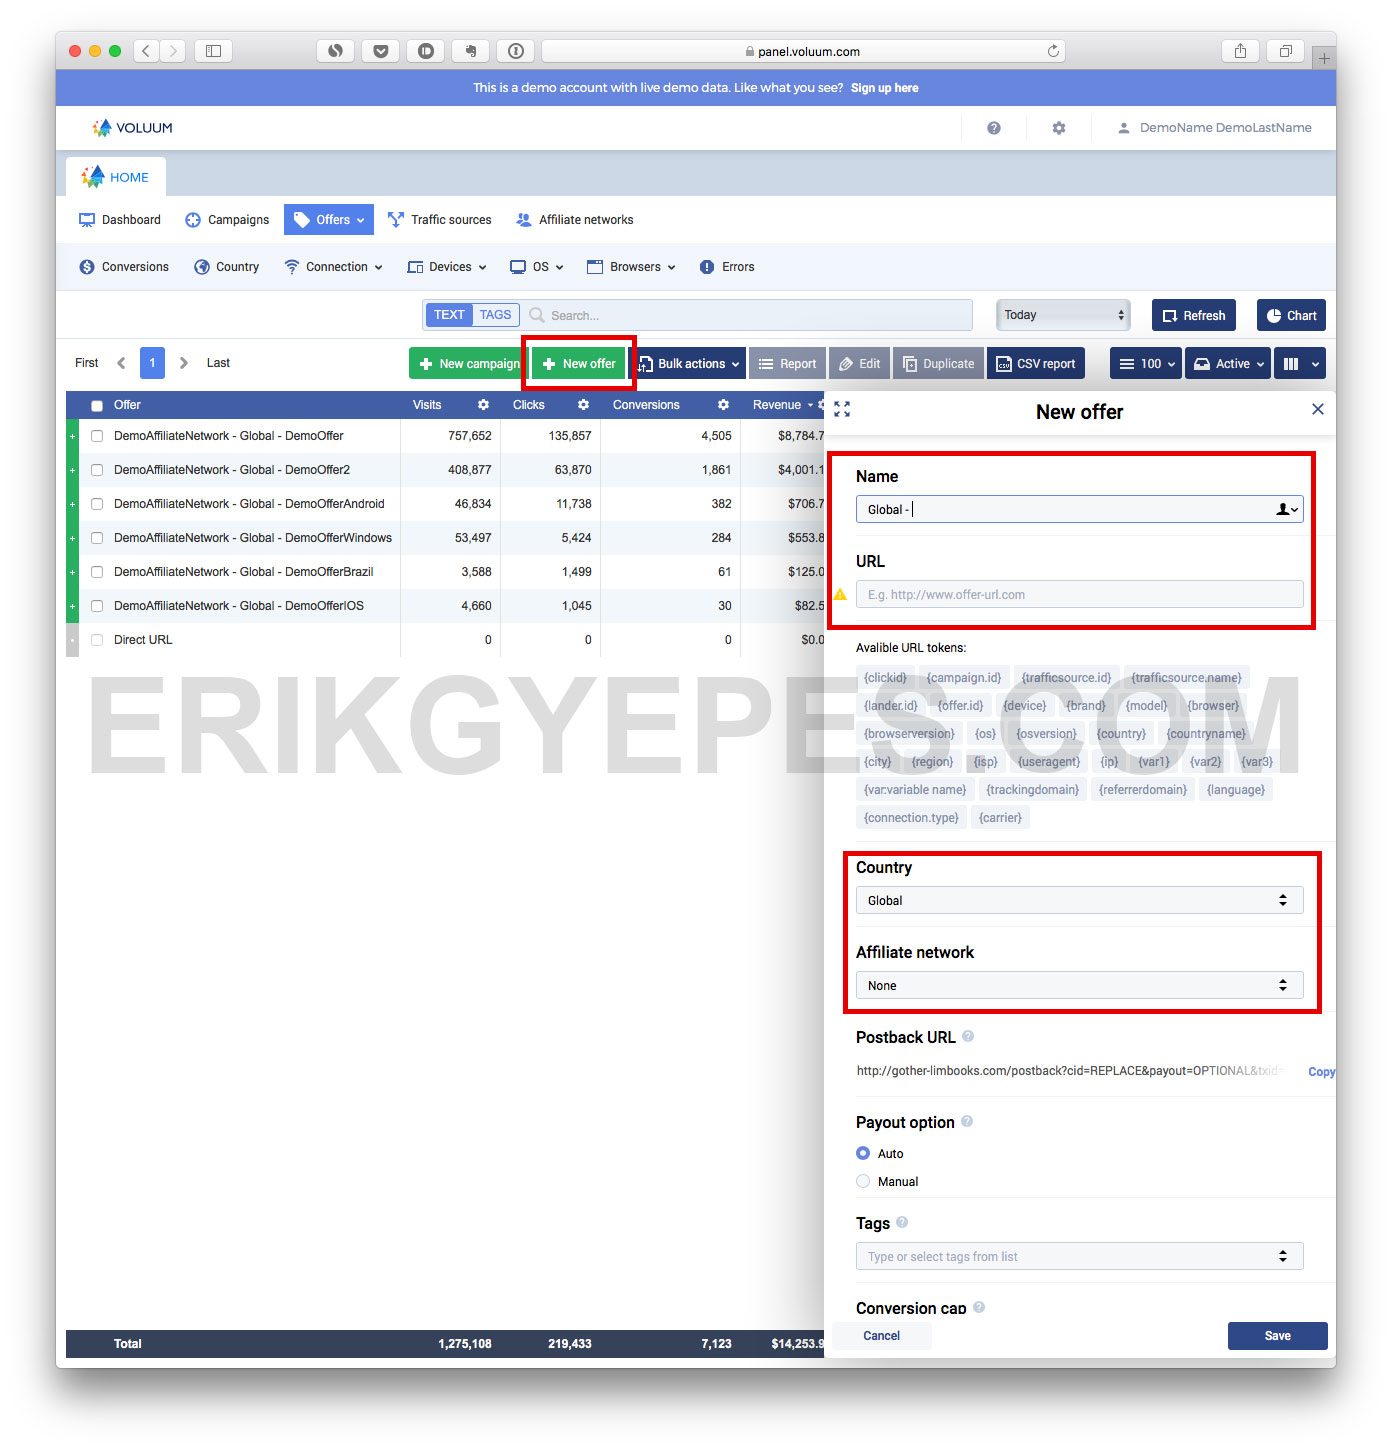
To add an offer, you need to copy your tracking link from your affiliate network.
Here is how you add a new offer in Voluum:
- Navigate to the Flows -> Landers tab.
- Click on “New offer”.
- Enter a descriptive offer name.
- Enter your tracking URL.
- Select the country for your offer (if the offer runs in multiple countries, leave the default option selected).
- Select the affiliate network that the offer belongs to.
- Leave payout on auto (that’s why you need to set up your postback correctly).
- Click “Save”.
How to add landing pages
Here is how you add a new landing page in Voluum:
- Navigate to the Flows -> Landers tab.
- Click on the “New lander” button.
- Enter a descriptive name for your landing page.
- Enter your landing page URL + add your tokens (as explained above in the tokens section).
- Choose your campaign’s country.
- Additionally, you can also add tags, but it’s not necessary.

Set up your first campaign
You finally made it to the most exciting step: creating your first campaign in Voluum!
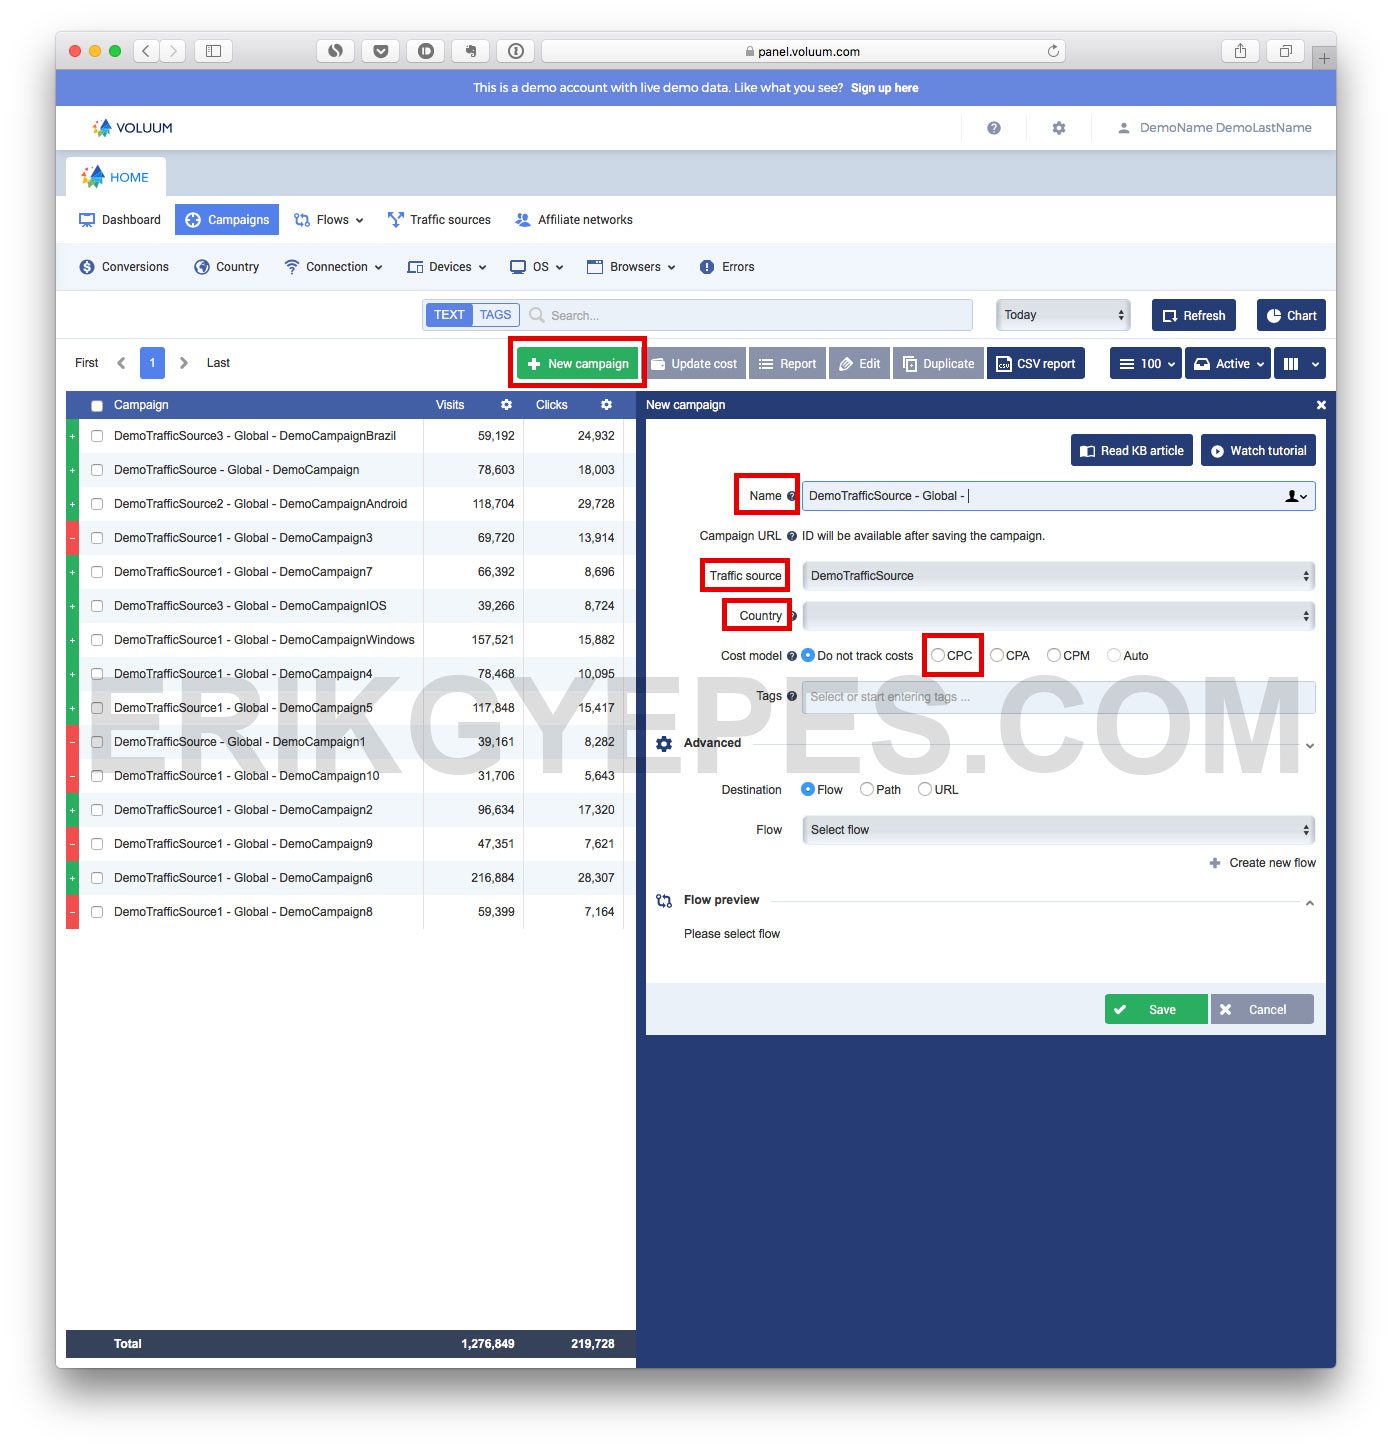
Here is how you create a new campaign in Voluum:
- Navigate to the Campaigns tab.
- Click on “New campaign”.
- Enter your campaign name.
- Select your traffic source.
- Select country.
- Set the cost model to CPC and enter how much you pay for 1 visit/click (in case you pay for traffic in CPM, you have to divide that value by 1000, i.e. $5 CPM = 0.005 CPC).
- In the advanced settings, choose Path and select your landing page and offer combination. If you don’t want to use a landing page, check the “Direct linking” box.
- Click “Save”.
✅ Wrap up
And that’s it.
At this point, you should have a better understanding of how tracking and trackers work and you should be able to set up everything by yourself.
It may look complicated at first, and you will probably need to come back and reread the steps, but after launching a few campaigns, you will know Voluum like the back of your hand.
Let me know in the comments if you have any more questions! I want this guide to be the best around, so I will keep updating it over time.
If you find this post useful, please consider sharing it with your fellow affiliates. It took me many hours to write and verify all the information and steps.
Thank you so much guys!
 Hey! I'm Erik and I live in Thailand. I'm addicted to making money with affiliate marketing combined with paid traffic!